Although not very common in WODs, the handstand walk is a great skill to have in your athletic inventory. Learn and practice this feat with the help of the following tips, holds and progressions.
Indeed, strength lies at the core of Crossfit. From basic push-ups to deadlifts and rope climbs, the exercises of this discipline greatly rely on force, skill and muscular endurance. A complete crossfit athlete is also expected to master exercises such as the handstand walk.
As well as being an impressive gymnastic skill to master, the handstand walk yields many other benefits:
To increase your general athletic ability
Just like swimming or riding a bike, freestanding handstands and the handstand walk are skills accessible to almost everyone, as they do not require any extraordinary amount of strength. They are feats which must be learned from scratch, with patience and persistence, and which will challenge your limits and expand your collection of athletic skills. In other words, they will offer you the satisfaction of having taught your body something new and spectacular.
To train your balance and body awareness
Being able to maintain the same upright position of the body during a handstand walk requires the constant isometric contraction of deep, stabilising muscles. Furthermore, the exercise is very efficient in proprioceptive training.
To strengthen the muscles of your upper body
Among the main muscles engaged in supporting your body during a handstand walk are the pectoralis major, deltoids, trapezius and latissimus dorsi. By raising one arm at a time, you commit your entire weight to one point of support, making the chest, back and pectoral girdle muscles contract even more to maintain the position.
To reach RX level in Crossfit
They may not feature in workouts very often, but they are infamous for having posed a challenge to many elite Crossfitters at the biggest events of the sport. For instance, the handstand walk was part of the 2015 Regionals and of the 2016 CrossFit Games.
To have fun!
In spite of possibly being frustrating at first, the handstand walk will later become very enjoyable to perform. Particularly in front of an awestruck audience.
Let’s get started!
Holds and Progressions
1. HANDSTAND HOLD
Whether with the help of a wall or freestanding, the more time you spend on your hands, the more you will get used to the feeling of being upside down and the more you will engage and strengthen the muscles supporting you in this unnatural position.
The freestanding handstand
A prerequisite for the walk which we are now concentrating on, the freestanding handstand alone takes a lot of practice. However, once you master this, the handstand walk will not seem off-putting or unachievable anymore. Given the importance of the ability to hold the freestanding upside-down position in the context of the walk, this article will also include tips on improving general handstand technique.
Important!
Do not attempt the walk without having successful prior experience with freestanding handstands, as this may lead to injury. It is essential to know how to control your body and safely descend from an improper position. An athlete should master at least one so-called bail-out technique such as a cartwheel or forward roll before attempting a handstand walk. This will also give them the necessary self-confidence to execute the skill without fear of falling over.
Overhead plate hold
This is a useful approach in familiarising yourself with the straight position of the body that is the foundation of a classic handstand. It also statically helps increase the range of motion of the shoulders, which will facilitate a comfortable handstand position. Take a weight plate and bring it over your head. Activate your core and gluteal muscles and ensure that there is a straight line from your feet to your fingers. The shoulders are shrugged toward the ears.
Handstand hold against the wall
Climb a wall with your feet until reaching a vertical position. Your nose is as close to the wall as possible and your toes are touching the latter, providing a little support. Maintain this position keeping your core and gluteal muscles engaged.
Freestanding handstand hold (from the previous position)
Lightly kick away from the wall, trying to find the right amount of momentum to reach a position of balance.
Freestanding handstand hold
What it says on the tin. If you can successfully and regularly maintain this position, you may proceed to the next level:
2. SHOULDER TAPS AND HIP TOUCHES
These drills prepare you for all the weight-shifting involved in a handstand walk, while still offering you the support of the wall.
For the shoulder taps: from the handstand hold against the wall position, transfer your weight to one hand, then lift the other from the ground and bring it to the opposite shoulder. Alternate arms at a fairly fast pace.
Hip touches are a more advanced version of the shoulder taps, with the same goal of teaching weight transfer. Instead of touching your opposite shoulder, bring your hand all the way to the hip of the same side, then change hands.
3. KICK-AWAYS AND WALK-AWAYS
To do a kick-away, start from the same position as in the exercises described above, push against the wall with your dominant leg powerfully enough to allow yourself to make a few steps forward, keeping the wall within reach. Let your legs touch the wall again, crawl back to the starting position and repeat the sequence.
If you have managed to easily and safely perform kick-aways, it is now time for walk-aways. They are executed just like the former, except that the momentum of the push must be a little bigger, so that you can advance more towards the other end of the room, leaving the wall behind you. After mastering these walk-aways, you will be ready to try out the handstand walk with a good chance of reaching your goal.
Rich Froning in action
TECHNIQUE TIPS
Shoulders
Make sure that you are keeping your shoulders shrugged towards your ears at all times. Although it may feel unnatural (given that in other contexts athletes are advised against this), the position will help create a more stable upper-body structure which will more easily support your weight and maintain your balance.
Hands
Experiment with different hand placements and find out which you find more comfortable and efficient. You can either keep your fingers facing forward (as is desirable in handstand holds) or turn them slightly outward until your thumbs face forward. Some athletes and coaches prefer the second option as it involves a wider range of motion of the wrists, thus making the ‘walking’ movement feel more natural.
Legs
Unlike in the case of the handstand hold, keeping your legs together in a straight position with pointed toes is not required in a handstand walk. On the contrary, most athletes let their legs dangle freely or deliberately as a tool to stay balanced.
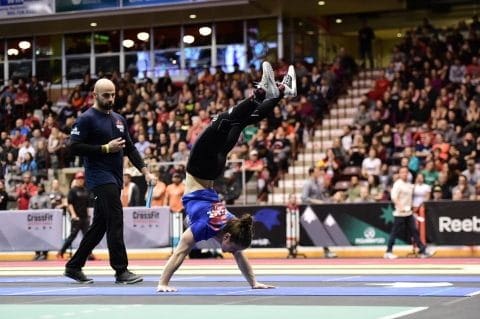
Sara Sigmundsdottir completes this difficult handstand walk challenge
Achieving a controlled handstand walk can be a fairly complicated process putting your patience, focus and determination to the test. However, the impressive skill which you will gain is sure to provide you with the joy of harmoniously bringing balance, strength and proprioception together to accomplish an advanced athletic feat which seems to become more and more popular in the world of Crossfit.
7 Gymnastic WODs to Test and Improve your Crossfit Skills
usa team handstand walk © CrossFit Inc
The post The Crossfitter’s Guide to Developing a Perfect Handstand Walk appeared first on BOXROX.